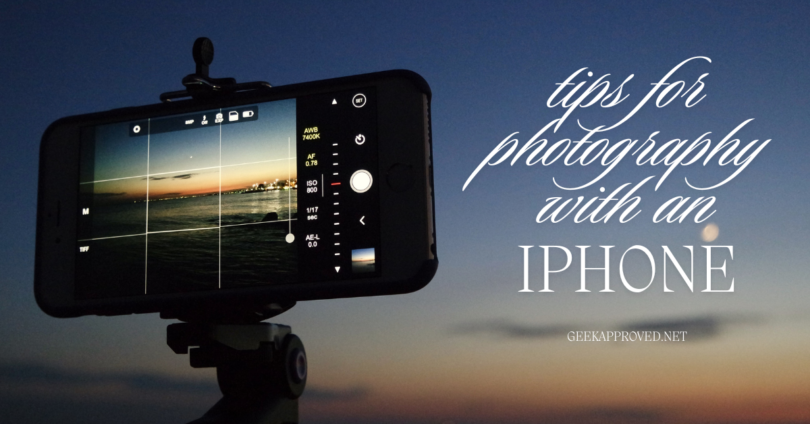
Nowadays, iPhones have elevated their camera levels to match a professional camera. Here are a few tips for photography with an iPhone, since many of us aren’t qualified enough to take professional pictures.
Learning to take pictures with an iPhone takes work. However, it is more than just expressing yourself. If you’re a content creator or just want to post good images for your social media then you must learn the tips for photography with an iPhone. The visual content will boggle both humans and social media algorithms.
Tips for photography with an iPhone
Shifting the perspective
We take the pictures in the way that we see the world. It is nothing condescending. It is natural. However, this might not do well for your pictures. To click some better images, try to take pictures from either a higher angle or a lower angle. Try to just change your standing or sitting position a little, for the effect to blend in.

Low-angle pictures are actually a useful way to put an interesting spin on iPhone product photography. If you think that the subject is too big to fit in the frame, this tip works well.
Detailing in close-up images
Photography is the art of expressing the world that you see to the rest of the world. Hence, shooting up close pictures can give an unexpected spin to everyday normal things.

Close-ups can showcase any kind of color, texture or even shape that may go unnoticed at a distance. This way, something ordinary can be turned into something interesting in the eyes of the world.
Turning on grid
One of the tips for photography with an iPhone is turning on the grids. This iPhone photography trick is called the rule of thirds. This rule turns on the grid and divides the field of your image into a three-by-three grid.

Placing the subject of your photo along the lines makes a huge visual impact and they create more visually compelling images. You can activate the grid lines by going to the Camera section of your iPhone and then turning the Grid switch on in the Settings.
Finding the leading lines
Incorporating long, straight lines in your photo helps to provide viewers with a roadmap which helps your audience make sense of the picture. These lines are known as leading lines. Leading lines can help to divide your photo into distinct parts, adding visual interest.

Leading lines running from the edge of the field toward the center of focus give a greater sense of depth to your image. This is one of the best tips for photography with an iPhone.
Creating a sense of depth
As difficult as it is to click compelling pictures, here are a few ways to add a sense of depth to your photo. While first learning to shoot a picture, we think about the frame in two dimensions. However, naked eyes are tricked often into seeing the depth in a flat object like an image.

You can take advantage of this factor by emphasizing depth in your composition. Doing so with leading lines is one way to do so, however there are some more ways.
You can place a close-up subject against an out-of-focus background is one of the ways to create a sense of depth.
Doing the opposite is useful as well. Try to frame a photo’s main subject behind a slightly out-of-focus object in the foreground.
If you want to try photography for landscape or outdoor photography, try including distinct visual elements at different depths for a multi-leveled sense of depth.
Symmetry is the big actor!
Our brains are fond of symmetry, however too much of anything leads to waste. To strike a balance, eye-catching compositions often include unequal elements on opposite sides of the frame. This trick creates a sense of organization without giving away too much.

Notice the leading lines connecting the bottles of whiskey to the single glass of whiskey. Both of the elements connect opposite parts of the frame and create visual contrast.
Keeping it simple
One of the best tips for photography on an iPhone is to keep it simple. Remember that if you are creating content for social media like Instagram, people are most likely to check it out on the small screens of a mobile phone.

A complex composition might look good in a large print, hanging on the wall; however, it becomes busy and confusing on a mobile screen. It might be better to tone down the complexity and toning down the composition to a few key elements might be easier to understand on a smaller screen.
Staging your shot
Your choice of subject determines your direct control over the visual elements. Hence, your composition depends solely on what you’re shooting. If you’re shooting a small or moveable subject, don’t hesitate to move them to get the proper lighting for the composition.
For larger objects, don’t just click pictures right away. Try to move around the scene. This can help in changing the composition of the photo even if all the elements are anchored in position.
Using a camera timer for steady shots
One of the most practical tips for photography on an iPhone is using the camera timer. Thanks to developments in technology, we no longer have to hold still for fifteen minutes for a steady shot. A shaky camera can turn a perfect image into a wrong mess of sorts.
The camera timer is not just for no-hand selfies. It can be used for any shot keep both hands on the camera when the shutter opens. This works better while working on stationary objects.
Adjusting focus and exposure settings
The default camera settings for the iPhone might be a blessing. However, sometimes you must take matters into your own hands. Two settings that are easier to handle are focus and exposure. The iPhone will guess the subject and automatically try to focus on it.
However, it doesn’t always guess rightly. To focus on something else, tap the screen where you want to focus to override your phone’s guess. The same can be done for exposure. Tap where you want to focus and then slide up or down to create brighter or darker exposure.

Get Your Latest iPhone & Gadget:
-
Sale!
iPhone 15 Pro Max
$1,099.00Original price was: $1,099.00.$999.00Current price is: $999.00. Buy product -
Sale!
Apple iPhone 15 Pro
$914.89Original price was: $914.89.$861.66Current price is: $861.66. Buy product -
Sale!
Apple iPhone 15
$684.99Original price was: $684.99.$651.89Current price is: $651.89. Buy product -
Sale!

Apple 2024 MacBook
$1,099.00Original price was: $1,099.00.$849.98Current price is: $849.98. Buy product
Conclusion
May it be social media or art, photography is a medium of expression. However, not everyone has access to a high profiling camera. In such cases, the iPhone becomes handy because of its camera quality. To master the camera of an iPhone, one will most certainly need the tips for photography with an iPhone.
It might be difficult to master photography, however, with available resources in the modern world, the process is much easier than it once was. Follow a few tips for photography with an iPhone, and content creation becomes, at least a little bit easier.